Have you ever thought about writing your life story? Maybe you want to leave a record for your family, share lessons you’ve learned, or simply make sense of your journey. The good news is that everyone has a story worth telling including you.
This guide will walk you through the entire process of writing your autobiography, from those first scary blank pages to holding your finished book in your hands. I’ll keep things simple, practical, and encouraging. Let’s get started!
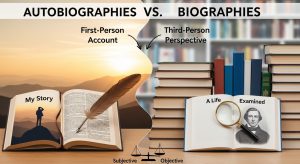
What Exactly Is an Autobiography?
Before we dive into the “how,” let’s understand what we’re actually creating.
An autobiography is the story of a person’s life, written by that person. The word comes from Greek: “autos” (self) + “bios” (life) + “graphein” (to write). It’s your life, in your own words, using “I” and “me.”
But here’s something important: an autobiography is not the same as a memoir.
Think of it this way:
- An autobiography covers your whole life from childhood to the present. It’s the complete picture.
- A memoir focuses on one specific theme or period like your years as a nurse, your journey through grief, or your adventure traveling across Asia.
For this guide, we’re focusing on writing a full autobiography. But the steps work beautifully for memoirs too.
Why Write Your Autobiography? (The “Why” Matters)
Knowing your reason for writing will keep you motivated when the process gets tough. Here are common reasons people write their life stories:
- To leave a legacy for children and grandchildren
- To heal from past wounds by understanding them better
- To share wisdom and lessons learned
- To celebrate how far you’ve come
- To simply tell your truth your version of events
Your turn: Grab a notebook and write down your top three reasons for wanting to write your autobiography. Keep this list nearby. On days when writing feels hard, it will remind you why you started.
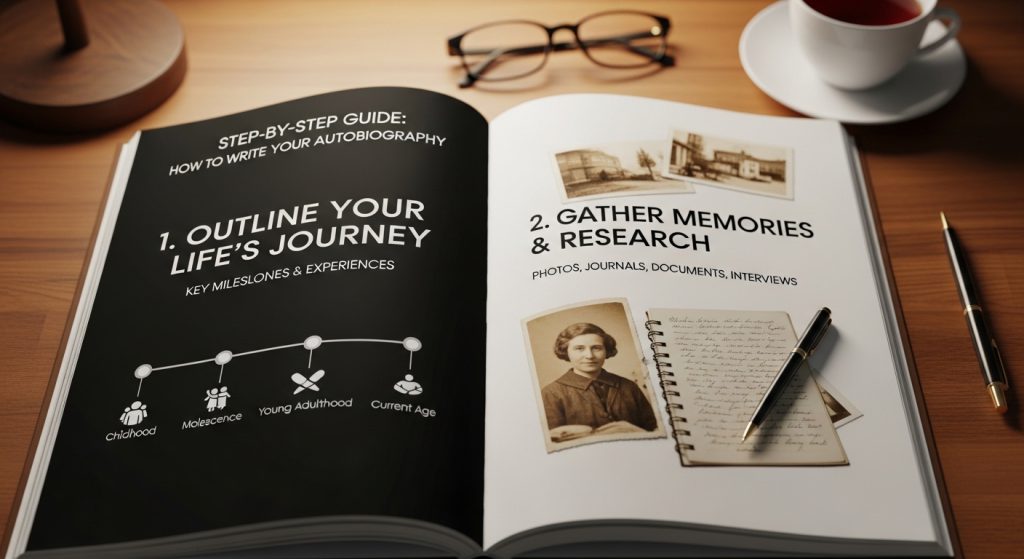
Step 1: Gather Your Materials and Memories
Before writing one word, become a detective of your own life.
Create a Memory Timeline
Take a large piece of paper and draw a line from left to right. Mark important years: your birth, first day of school, moves, jobs, relationships, achievements, challenges. Don’t worry about order yet—just dump everything onto the page.
Collect “Memory Triggers”
Gather items that spark memories:
- Photo albums and scrapbooks
- Old letters and diaries
- Report cards and work records
- Newspaper clippings
- Souvenirs and keepsakes
- Family recipes
Interview People Who Know Your Story
Talk to parents, siblings, old friends, and mentors. Ask them:
- What do you remember about that time?
- How would you describe me back then?
- What stories do you tell about me?
Their answers might surprise you and fill gaps in your memory.
Fun Statistic
According to a 2023 survey by the Association of Personal Historians, 78% of people who write their life stories discover at least one major family secret or previously unknown fact during their research. So be prepared for surprises!
Step 2: Find Your Theme
Your life isn’t just a list of events it’s a story with meaning. What’s the thread that ties everything together?
Ask yourself:
- What patterns do I see in my life?
- What lessons keep coming back?
- What values have guided my decisions?
- What’s the central message I want readers to take away?
Examples of themes:
- Resilience in the face of hardship
- The power of second chances
- Finding your voice
- The importance of family
- Faith as a guiding light
Your theme doesn’t have to be dramatic. It just needs to be true to you.
Step 3: Create Your Outline
Now we’re getting organized. Your outline is your roadmap it keeps you from getting lost in the wilderness of memories.
Basic Autobiography Structure
| Section | What Goes Here |
| Introduction | Hook readers, hint at your theme, make them want to know more |
| Early Years | Childhood, family, school, first memories |
| Coming of Age | Teen years, first jobs, early relationships, finding yourself |
| Adulthood | Career, marriage, children, major life events |
| Challenges | Struggles, failures, losses—and how you overcame them |
| Triumphs | Achievements, joys, proud moments |
| Reflection | What you’ve learned, who you’ve become, wisdom to share |
| Conclusion | Where you are now, hopes for the future, final message |
Within each section, list the key events you want to cover. Don’t worry about writing yet just bullet points are fine.
Step 4: Start Writing (The Fun Part!)
Here’s the secret most people don’t tell you: you don’t have to write in order.
Start with the story that feels most alive to you right now. Maybe it’s your wedding day, or the time you got lost as a kid, or your first job. Write that story with all the details you can remember.
Tips for Vivid Writing
Show, don’t just tell.
- Telling: “My grandmother was kind.”
- Showing: “Grandma always had warm chocolate chip cookies waiting after school. She’d pat the chair beside her and say, ‘Sit, child. Tell me everything.'”
Use all five senses.
What did you see, hear, smell, taste, and feel? Sensory details transport readers into your world.
Include dialogue.
Conversations bring your story to life. You don’t need word-for-word accuracy just capture the essence of what was said.
Be honest about your feelings.
Don’t just say what happened—say how you felt about it. Your emotions are what connect readers to your story.
Writing Statistic
Research from the University of Texas found that people who write about emotional experiences for just 15-20 minutes a day, three to four times a week, show measurable improvements in both mental and physical health. So writing is good for you!
Step 5: Develop Your Voice
Your “voice” is how you sound on the page. The best autobiography voice is simply you.
Read your writing aloud. Does it sound like you talking? If not, relax and write like you speak. Imagine you’re telling your story to a good friend over coffee.
Questions to find your voice:
- Do you use formal language or casual slang?
- Are you funny or serious?
- Do you tend to be detailed or get straight to the point?
- Do you share feelings openly or keep them private?
Your voice might even change depending on the story you’re telling and that’s perfectly fine.
Step 6: Handle Difficult Memories Carefully
Most lives include pain loss, failure, regret, trauma. Writing about these moments takes courage.
Guidelines for Tough Topics
- You control what you share. This is YOUR story. You don’t have to include anything that feels too private or painful.
- Consider others. If you’re writing about living people, think about how they might feel. You can change names or alter identifying details if needed.
- Focus on your experience. You can’t control how others acted, but you can share how their actions affected you.
- Find the lesson. Even painful experiences usually taught you something. What wisdom came from the struggle?
- Be kind to yourself. If writing about trauma becomes overwhelming, take a break. Consider talking to a counselor. Your wellbeing matters more than any book.
Step 7: Add Context and Research
Your life didn’t happen in a bubble. Placing your story in historical context makes it richer and helps future readers understand your world.
Consider including:
- Major world events happening at the time (wars, elections, disasters)
- Cultural touchstones (popular music, movies, fashion)
- Technology (did you use typewriters? rotary phones?)
- Social norms (what was expected of people like you?)
For example: “I graduated high school in 1968, a year of protests and change. The night of my prom, news broke about Martin Luther King Jr.’s assassination…”
Quick Research Tips
- Look up old newspapers online
- Check historical timelines
- Ask others what they remember about specific years
- Use websites like History.com for context
Step 8: Write Your First Draft to the End
Now it’s time to connect all your stories into one flowing narrative.
Don’t aim for perfection. Your only goal right now is to get the complete story down. You’ll fix problems later.
If you get stuck, try these tricks:
- Skip to a different section and come back
- Set a timer for 15 minutes and write without stopping
- Read what you’ve written so far to get back in the flow
- Remember: done is better than perfect
Step 9: Revise and Polish
Congratulations! You have a complete draft. Now the real work begins.
The Revision Process
Step 1: Take a break. Put your manuscript away for at least a week. You need fresh eyes.
Step 2: Read it through completely. Don’t fix anything yet just read and take notes about big-picture issues:
- Does the story flow logically?
- Are there gaps that need filling?
- Is anything confusing?
- Does the beginning hook readers?
- Does the ending satisfy?
Step 3: Fix the big stuff. Add missing scenes, move sections that are in the wrong place, cut stories that don’t serve your theme.
Step 4: Get feedback. Ask 2-3 trusted people to read your manuscript. Ask them:
- What parts did you love?
- Where did you get bored or confused?
- What did you want to know more about?
Step 5: Line edit. Now go through sentence by sentence, fixing awkward phrasing, checking grammar, and making your writing shine.
Step 6: Proofread. Check for typos and small errors. Reading backward (starting at the end) helps you catch mistakes.
Step 10: Decide on Publication
You have options for sharing your story:
Traditional Publishing
- Submit to publishing companies
- Requires a literary agent usually
- Very competitive
- Publisher handles editing, design, distribution
- Takes 1-2 years or more
Self-Publishing
- You control everything
- Keep all royalties
- Faster process (months instead of years)
- You pay for editing, design, formatting
- Platforms like Amazon KDP, IngramSpark
Family Publication
- Print copies just for family and friends
- Use services like Shutterfly or local printers
- Most affordable option
- Keeps your story private
Digital Only
- Create an ebook or PDF
- Share via email or website
- No printing costs
- Easy to update
FAQs About Writing Autobiographies
How long should my autobiography be?
There’s no rule. Some are 50 pages, some 500. Aim for whatever length does justice to your story. Most first-time authors end up between 200-300 pages.
Do I need to be famous to write an autobiography?
Absolutely not! Regular people have the most relatable stories. Your family and friends will treasure your memories regardless of fame.
How do I protect privacy of people I write about?
You can change names, combine characters, or alter identifying details. If you’re worried about someone’s reaction, consider showing them what you wrote before publishing.
What if I don’t remember things clearly?
Be honest about memory gaps. Say “I believe…” or “As I recall…” Your truth is your truth. You’re not writing a legal document.
Can I use photos in my autobiography?
Yes! Photos make your story come alive. Just ensure you have permission if others appear in them.
How do I overcome writer’s block?
Try writing prompts, switch to a different section, set tiny goals (just 5 minutes), or talk your story into a recorder and transcribe it later.
Real Stories, Real Inspiration
Many people worry their lives aren’t interesting enough to write about. But consider these examples:
- Cordell Taylor wrote inspirational Christian poems while serving a prison sentence. His words about faith and redemption touch hearts because they come from real experience. His book, published October 14, 2025, proves that powerful stories can emerge from anywhere.
- Irwin Gould, an author, actor, and businessman, shares how challenges tested his strength. His journey shows that with hard work, resilience, and faith, anything is possible. You can learn more about what makes an autobiography meaningful through his insights.
Your story has value too. Maybe you’ve overcome illness, raised amazing children, built something from nothing, or simply lived through interesting times. That’s enough.
Your Autobiography Timeline: A Realistic Schedule
| Stage | Time Needed |
| Gathering memories | 2-4 weeks |
| Outlining | 1-2 weeks |
| First draft | 3-6 months |
| Rest period | 2-4 weeks |
| Revisions | 1-3 months |
| Feedback | 2-4 weeks |
| Final polish | 2-4 weeks |
| Publication prep | 1-3 months |
Total: 6-12 months for a focused writer. But go at your own pace—this isn’t a race.
Tools to Help You Write
You don’t need fancy equipment:
- Computer with word processing software (Microsoft Word, Google Docs)
- Notebook and pen for writing anywhere
- Recording app for capturing thoughts while driving or walking
- Scrivener software (great for organizing long projects)
- Grammar checker like Grammarly for final polish
Ready to Start? Here’s Your First Step
Don’t wait until you feel “ready.” You’ll never feel completely ready. Start today with one small action:
- Write for 10 minutes about your earliest memory
- Call a family member and ask one question about your childhood
- Find one photo and write what you remember about that day
- Make a list of 10 stories you definitely want to include
That’s it. Just start.
Your Story Matters
Every life has meaning. Every person has lessons worth sharing. Your grandchildren, your community, even strangers who need hope someone needs to hear your story.
Writing an autobiography takes time and courage. There will be days when you wonder why you started. But there will also be moments of joy, healing, and discovery. And in the end, you’ll have something precious: your life, captured in words, preserved for those who come after you.
Your Next Steps
- Begin your timeline today using the steps above
- Visit Irwin Gould’s guide for more on understanding autobiographies
- Check out Cordell Taylor’s book for inspiration on sharing personal truth
- When you’re ready to publish, explore ordering options to see how others have done it
The world is waiting for your story. What will you write first?